Backtracking AWS Lookout For Vision Service #
The article tries to trace back AWS Lookout for Vision: Edge service model and successfully custom loads the model for inference (Just imagine the reduced inference cost 🔥)
Co-Author: Palash Nimodia
Date: June 23, 2022
Medium Link: https://medium.com/@yogenyat/backtracking-aws-lookout-for-vision-service-136c47c85168
Introduction: #
NOTE for the reader: Its fine if you have not used AWS Lookout For Vision service before, but if you are interested in knowing how we can back-track a managed service (if possible 🙈), you are at the right place.
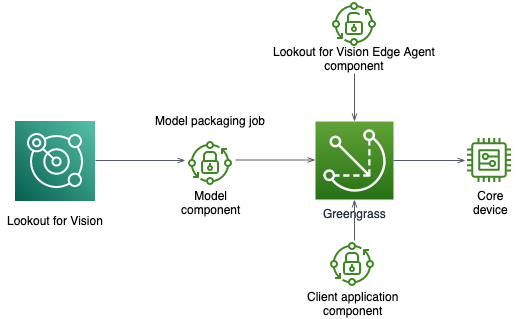
Amazon Lookout for Vision (LFV) has recently released preview support for anomaly detection at the edge. It is a machine learning (ML) service that spots defects and anomalies in visual representations of manufactured products using computer vision (CV), allowing users to automate quality inspection. ML model is trained to spot anomalies from live production line with as few as 30 images for the process which needs to be visually inspected — with no machine learning experience required. Now, in addition to detecting anomalies in the cloud, Amazon LFV model can be hosted on edge using AWs IoT Greengrass V2 compatible edge devices.
Prerequisite:
→ Train a Lookout For Vision Model using AWS Console
→ Compile and package the model for edge hosting
→ The below work has been tested on EC2 instance and SageMaker Notebook Instance (EC2 instance as edge) having Nvidia T4 GPU (instance — G4dn.xlarge)
Once training and packaging the trained model is complete, our journey starts here.
We try to trace-back the service to identify how the LFV service trains its anomaly detection model, what post-processing it performs on the trained model and if there is any minute chance of custom hosting it for inference.
THE JOURNEY BEGINS: #
A. Model Packaging: #
A model packaging job packages an Amazon Lookout for Vision model as a model component. While packaging your custom trained model, there is an option for target-device and target-platform. Since we are testing this on EC2 instance, we will choose our target as: target-platform in this case.
After choosing the platform, we will choose compiler-options. Within compiler option, we will have to provide the GPU which we will be using, the tensorrt version and the Cuda library version. For more details, please follow the documentation at the following link: LINK
Our configuration for G4dn.xlarge Instance:
{‘gpu-code’: ‘sm_75’, ‘trt-ver’: ‘7.1.3’, ‘cuda-ver’: ‘10.2’}
So here comes our first clue, the service is post-processing our model by optimizing it using NVIDIA TensorRT SDK.
Question: We still do not know if the following model is trained using Tensorflow or Pytorch or any other Deep Learning framework… !!
B. Analyzing Zipped model #
Image Description: Zipped Model Contents
Zipped Model contents
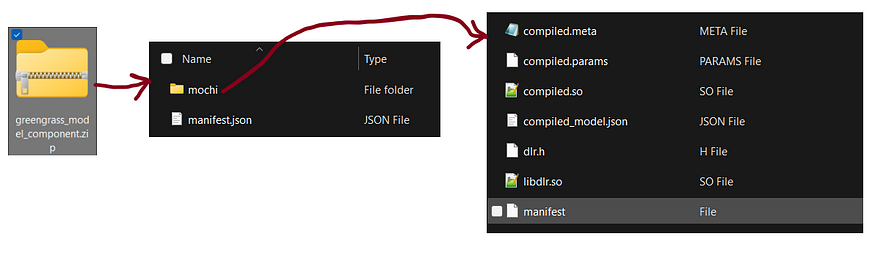
Once the model is trained → compiled → TensorRT optimized, it gets saved to AWS S3 in a zipped format. In our case, the zip file and contents within the zip looked something like image above:
If we closely observe, there are two things inside it:
- Folder — “mochi” (including the sub-files within this folder)
- manifest.json file
The manifest.json file contains the following contents:
{“model_graph”: {“model_graph_type”: “single_stage_model_graph”, “stages”: [{“class_normal_ids”: [1], “seg_normal_ids”: [], “classification_head_enabled”: true, “segmentation_head_enabled”: false, “threshold”: 0.7021560668945312, “normalize”: true, “image_range_scale”: true, “image_width”: 1000, “image_height”: 1000, “input_shape”: [1, 3, 1000, 1000], “type”: “mochi”}], “image_level_classes”: {“names”: [“anomaly”, “normal”], “normal_ids”: [1]}, “pixel_level_classes”: {“names”: [], “normal_ids”: []}}, “compilable_models”: [{“filename”: “mochi.pt”, “data_input_config”: {“input”: [1, 3, 1000, 1000]}, “framework”: “PYTORCH”}], “dataset”: {“image_width”: 1000, “image_height”: 1000}}
The Analysis from the folder and JSON file is as follows: #
- The folder name itself is quite unique and hence raises a question: Could “mochi” be some latest/open-source model ?
- The JSON file contains a key-word named: “mochi.pt”
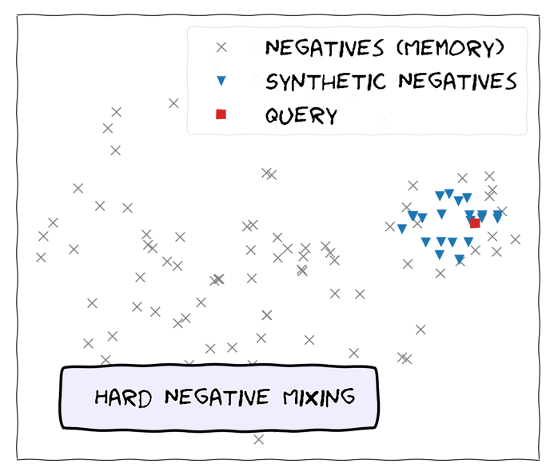
- Web-searching on the “mochi” term led to an interesting discovery. It resulted in the following paper: Hard Negative Mixing for Contrastive Learning (Paper Link) where MoCHI stands for “(M)ixing (o)f (C)ontrastive (H)ard negat(i)ves”.
- The paper proposes a semi-supervised way of training Deep Learning models using Contrastive Loss where it highlights the importance of “Hard-negatives”. The proposed approach generates synthetic hard negatives on-the-fly for each positive (query). (Note: Please read about contrastive loss and semi-supervised learning for more details …… this was first time for me as-well😢)
Illustration of MoCHi
-
It could be assumed that Lookout for Vision has a pre-trained semi-supervised defect detection model. For new model training on customer data, this pre-trained model is further fine-tuned on new data and saved. Hence, this can be also related to the unique feature of the service, which is the need for a very small amount of annotated data as it could be using semi-supervised learning algorithm internally.

Content within manifest.json file…
-
Now, lets have a quick peek at content.json file:
- It tells us that the trained model is a “Pytorch” model with model name as: mochi.pt.
- The model is trained and inferred on shape: 1000x1000x3
- Even though the service only supports binary classification, the model has 2 output neurons. One output states whether the input image is “normal” or not. Another output states whether the input image is “anomaly” or not.
- The threshold for detecting output is set at: **0.7021 (at-least to the model trained in our case)
**- There is key-value pair named: → “normalized”: True. From here, we can assume that the output of the last layer is Normalized using Softmax layer.
-
Now, lets quickly analyze the other sub-files from the “mochi” folder.
- The libdlr.so file and dlr.h file tells us that the model is compiled using Neo-AI-DLR package (LINK). - DLR is a compact, common runtime for deep learning models and decision tree models compiled by AWS SageMaker Neo , TVM , or Treelite . DLR uses the TVM runtime, Treelite runtime, NVIDIA TensorRT™, and can include other hardware-specific runtimes.
-
The libdlr.so file in the model zip specifies the platform details of the compiled model while custom loading in NeoAI-dlr. Hence, it’s required while loading the model on any g4dn.xlarge instance (Nvidia T4 GPU) (Note: Our model was compiled for Nvidia T4 GPU)
C. Edge Model Custom Loading: #
We have learnt a lot about this model now. Somehow, lets crack the hidden mystery on how to load it manually without using AWS SDK….
Requirements: #
- Instance with Nvidia T4 GPU (Tested on SageMaker Notebook and EC2 instance of type: g4dn.xlarge)
- DLR installed with GPU support. It can be installed by building from source or using **pip with pre-built binaries. (**on development instance, it was installed using: pip install {prebuilt supported binary} )
- Edge model zip file locally available and unzipped.
- Python libraries required: dlr, numpy, cv2, os, torch
Image pre-processing before inference: #
(IMPORTANT NOTE: The below listed pre-processing was found using multiple trial and error by comparing custom loaded model inference with the console displayed information)
- Read the image using Opencv (cv2) image library
- Convert BGR channel image to RGB channel image (Opencv image are read in BGR channel)
- Resize the image to size: 1000x1000 (3 channel)
- Normalize the image between scale: 0–1 (divide by 255)
- Standardize the image with **ImageNet channel wise mean and standard deviation (order: RGB):
- mean=[0.485, 0.456, 0.406]
- standard-deviation (std) =[0.229, 0.224, 0.225]**
- Make the image channel first (Earlier: 1000x100x3, After: 3x1000x1000)
- Expand image dimension to treat it as batch size 1 for inference. (final dimension: 1x3x1000x1000)
Model Loading and Inference: #
We have finally analyzed multiple things and came to few major conclusions, such as:
- The training is performed using Pytorch Library
- The model is TensorRT optimized
- The model is compiled using NeoAI-DLR package for Nvidia GPU
- The trained model is a Semi-supervised model (MOCHI)
- Inference Image Size: 1000x1000x3
- Image Pre-processing decoded(mean, standard-deviation, order of image channel)
- Code to load the model using DLR package and inference.
lookout_for_vision_custom_loading.py · GitHub
import dlr
import numpy as np
import cv2
import os

# DLR installation

# pip install https://neo-ai-dlr-release.s3-us-west-2.amazonaws.com/v1.10.0/gpu/dlr-1.10.0-py3-none-any.whl

# Load model.

# /path/to/model is a directory containing the compiled model artifacts (.so, .params, .json)

model = dlr.DLRModel('./mochi/', 'gpu', 0)

def process_image(img):
    # normalizing the image (0-1) and
    # standardizing with ImageNet Mean and Std-deviation
    img = img/255
    img[:,:,0] = (img[:,:,0] - 0.485)/0.229
    img[:,:,1] = (img[:,:,1] - 0.456)/0.224
    img[:,:,2] = (img[:,:,2] - 0.406)/0.225

    # convert image to channel first from channel last
    img = img.transpose(2,0,1)

    # Expanding dimension to treat it as batch-size: 1
    img = np.expand_dims(img, axis = 0)

    return img

def predict_on_image(img_path, model):
    # read image and convert to RGB
    img = cv2.imread(img_path)
    img = cv2.cvtColor(img, cv2.COLOR_BGR2RGB)

    # resize the images if needed

    # Process image
    img = process_image(img)

    # infer and print result
    y = model.run(img)
    return round(y[0][0][0], 3), round(y[0][0][1], 3), np.argmax(y)

folder_path = './temp/'

for img_name in sorted(os.listdir(folder_path)):
    if('.jpg' not in img_name):
        continue
    img_path = os.path.join(folder_path, img_name)
    print(img_name)
    a,b,c = predict_on_image(img_path, model)
    print(c,'====', a,b)
We were able to successfully load and infer on our test images using the above attached code. To validate our work, we performed one experiment on it which is as follows:
— Took one image data-set and converted it to train and test set
— Train the model on train-set using AWS console and package it for edge such that its zip file is saved in S3. Fetch the zip file and store it in test-environment
— Infer the model on the cloud using the AWS Console on the test-set. Record its results and model confidence
— Now, infer using the edge-model on the testing instance using the above code on the test-set images. Record the results and confidence score
Result: #
We observed that, when the test-set was inferred on the edge using custom loading of the model, the inference results and the confidence scores were exactly identical as compared with the AWS LFV Console inference.
With this in hand, we can easily see how much cost we could save in future, as we will only have to bear the training cost and avoid all the AWS API/SDK inference cost. Lets say, we are on a NVIDIA Jetson device and we have trained a AWS LFV model, we will be able to directly infer on new images/video-frames using custom loading.
If you have actually read this much and liked it, please do not forget to give a clap and subscribe for future articles…..
THE END…..
| Tags | AWS, Computer Vision, Pytorch, Deep Learning, Cloud Computing |
|---|---|